
Although it’s not obvious how to do it, pinning documents to Windows Start Menus is possible
 This blog post was written for Windows 10 (as reflected in the illustrations below).
However, it also works for pinning documents to the Windows 11 Start Menu (post updated 09/11/2023 and 21/03/2024)
If you have documents that you need to access often – such as Word, Excel, Powerpoint files, or pdf files – you may want to access them directly from a “tile” on the Start Menu.
Yes, I know that a shortcut can be added to the desktop, but the problem with desktop shortcuts is that Windows has an irritating habit of “re-organizing” them such that you can’t find anything quickly. You can also add a shortcut to the taskbar, but space is limited on the taskbar.
Well, there is a way to pin documents to Start Menus. It involves three steps:
- Create a desktop shortcut to the document
- Add that shortcut to the folder that contains the Start Menu items
- Create a Start Menu tile from the new entry in the Start Menu list of “All Apps”
Create a desktop shortcut to the document:
- Open File Explorer and find the document
- Right-click on the document
- Left-click on “Send to”
- Left-click on “Desktop (create shortcut)”
Next, add that shortcut to the folder that contains the Start Menu items:
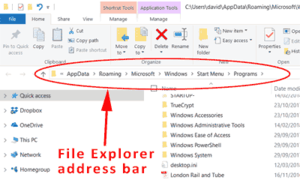
- Open a “File Explorer” window
- Type the text on the next line into the address bar in the File Explorer window, and hit the Enter key (or you can copy/paste the line below):%AppData%\Microsoft\Windows\Start Menu\Programs
- If you want the shortcut to appear on the Start Menu of all other users on this computer as well as your own then, instead of the line above, type the line below into the File Explorer window, and hit the Enter key (or you can copy/paste the line below):%ProgramData%\Microsoft\Windows\Start Menu\Programs
- Drag the File Explorer window around the desktop until you can see the shortcut to the document that you created in the first step
- Drag the shortcut from the desktop into the File Explorer window you opened above

Then create a Start Menu tile from the new entry in the Start Menu list of “All Apps”
- Open the Start Menu
- Select the “All Apps” view on the Start Menu (see illustration)
- Find the entry for the new item, right-click on it, and left-click on “Pin to Start”
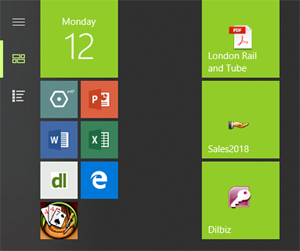
- Display the tiles by clicking on the “Pinned Tiles” icon (see illustration)
That’s it. You now have a “tile” of your document on the Start Menu. It’s very much faster to open a document this way than to open its associated program and then open the document from within the program.Unlike desktop icons, this tile will stay in the same place.
You can change the wording on the Start Menu tile by renaming the desktop shortcut before dragging it into the “Start Menu\Programs” folder. Rename the desktop shortcut by right-clicking on it and left-clicking on “Rename”. You can rename the shortcut to anything you like (removing the word “shortcut” and the “.pdf”, for instance).
So, pinning documents to start menus may not be quite as straightforward as you would expect, but once they’ve done it you will always be able to get to your important documents.
For more about Windows Start Menus, see this Microsoft page.
Image by rawpixel.com on Freepik
Photograph – DIL